
Dash Cam Hardwire Kit: Complete Guide for 24/7 Protection
Everything you need to know about hardwiring your dash cam for continuous parking surveillance, cleaner installation, and reliable power.
VIEW RECOMMENDED KITSWhy Go Hardwired? A dash cam hardwire kit eliminates the need for a 12V socket, frees up your car's power port, and enables parking mode surveillance. It's the professional way to install a dash cam for maximum security and minimal clutter.
What You'll Learn in This Guide
What Is a Dash Cam Hardwire Kit?
A dash cam hardwire kit is an aftermarket wiring solution that connects your dash camera directly to your vehicle's fuse box, rather than plugging into the cigarette lighter (12V socket). This allows the dash cam to draw power from the car's electrical system continuously — even when the ignition is off — enabling 24/7 parking mode recording.
Instead of dangling cables and occupying your only power port, a hardwire kit routes power behind the dashboard trim, delivering a clean, factory-quality installation. Most kits include a voltage converter that steps down your car's 12V or 24V output to the 5V typically required by dash cams, along with fuse taps and a low-voltage protection circuit.
For drivers who already own a 4K dash cam for car or a wireless dashcam, adding a hardwire kit is one of the most practical upgrades you can make. It transforms a simple recording device into a full-time security system for your vehicle.
Kit Components Explained
A typical dash cam hardwire kit is more than just a cable — it's a complete power management system. Understanding each component helps you install it correctly and choose the right kit for your needs.
Fuse Taps (Add-a-Circuit)
These plug into your vehicle's fuse box, tapping into existing circuits for both constant power (battery) and switched power (accessory). They allow you to add a new circuit without cutting factory wiring.
Voltage Converter
Converts your car's 12V or 24V electrical output down to the 5V that most dash cams require. Quality converters ensure stable, noise-free power delivery.
Low-Voltage Protection
This critical circuit monitors your car battery and cuts power to the dash cam when voltage drops below a set threshold (typically 11.6V–12.4V), preventing a dead battery.
Mini USB / Micro USB / USB-C Connector
The output end that connects to your dash cam. Match this to your camera's port — many newer models use USB-C, while older ones use mini or micro USB.
Ground Wire (Ring Terminal)
Connects to a metal bolt or screw on your car's chassis to complete the electrical circuit. Usually includes a ring terminal for secure attachment.
Inline Fuses
Protect both your dash cam and your vehicle's electrical system from power surges or short circuits. Typically rated between 2A and 5A.
Key Benefits of Hardwiring Your Dash Cam
Upgrading from a plug-in power adapter to a hardwire kit delivers several practical advantages that go beyond mere convenience.
1. True 24/7 Parking Surveillance
When your dash cam is hardwired, it can continue recording while your car is parked and the engine is off. This is essential for capturing hit-and-run incidents, vandalism, or theft attempts. Without a hardwire kit, your camera shuts off as soon as you remove the key from the ignition.
2. Cleaner, More Professional Installation
Hardwiring hides all cables behind trim panels and under the headliner. There are no wires crossing your dashboard or dangling from the windshield. This not only looks better but also keeps the driver's view unobstructed and complies with many local regulations.
3. Frees Up Your 12V Socket
Your car's cigarette lighter port remains available for charging phones, powering GPS units, or running other accessories. This is especially valuable in older vehicles with limited power outlets.
4. More Stable Power Delivery
Direct fuse box connections provide consistent voltage without the intermittent power issues that can plague socket-based adapters, especially on rough roads. This means fewer corrupted recordings and more reliable performance.
If you're also considering a secondary camera for complete coverage, pairing a hardwire kit with a rear view camera wireless system gives you front and rear protection with the same clean installation.
Types of Dash Cam Hardwire Kits
Not all hardwire kits are created equal. They come in several configurations, each suited to different dash cams and installation scenarios.
| Kit Type | Best For | Key Feature | Typical Price |
|---|---|---|---|
| 2-Wire Kit | Standard dash cams with parking mode | Constant + ground, with low-voltage cutoff | $12–$20 |
| 3-Wire Kit | Advanced dash cams needing accessory signal | Constant + accessory + ground for mode switching | $18–$28 |
| USB-C Hardwire Kit | Modern dash cams with USB-C ports | USB-C output, supports higher power delivery | $15–$25 |
| OBD-II Hardwire Kit | Plug-and-play, no fuse box access needed | Connects via OBD-II diagnostic port | $20–$35 |
| Truck/24V Kit | Commercial vehicles, trucks, buses | Supports 24V input with wider voltage range | $25–$40 |
Installation Overview: Step by Step
Installing a dash cam hardwire kit is a moderate DIY project that typically takes 30–60 minutes. While the exact process varies by vehicle, the general steps remain the same. If you're uncomfortable working with automotive electrical systems, professional installation is always an option.
Step 1: Gather Your Tools
You'll need a fuse tap kit (usually included), a multimeter or test light, trim removal tools, a socket wrench set, zip ties, and electrical tape. A fuse diagram for your specific vehicle make and model is invaluable.
Step 2: Locate Your Fuse Box
Most vehicles have an interior fuse box under the dashboard or in the passenger footwell. Some also have one in the engine bay. Consult your owner's manual to find the correct location and identify a constant power fuse and a switched (accessory) fuse.
Step 3: Identify Constant and Switched Circuits
Use your multimeter to test fuses. A constant circuit has power with the key removed; a switched circuit only has power when the ignition is on. You'll need both for full parking mode functionality. If you own a mirror dash cam, the same principles apply, though routing may differ slightly.
Step 4: Connect the Fuse Taps
Remove the original fuse from the chosen slot and insert it into the fuse tap's lower slot. Then plug the tap into the fuse box. The tap's pigtail wire carries power to your hardwire kit.
Step 5: Route the Cable
Run the hardwire cable from the fuse box, behind trim panels, up the A-pillar, and along the headliner to your dash cam's mounting position. Use trim tools to tuck wires without damaging panels.
Step 6: Connect the Ground Wire
Find a metal bolt or screw attached to the car's chassis near the fuse box. Loosen it, attach the ring terminal, and tighten securely. A poor ground connection causes intermittent power issues.
Step 7: Connect to Your Dash Cam and Test
Plug the output connector into your dash cam. Start the engine, verify the camera powers on, then turn off the engine and confirm parking mode activates (if supported). Check that the low-voltage cutoff is set appropriately.
For vehicles where running wires to the rear is necessary — such as with a wireless dash cam front and rear setup — plan your cable route carefully before starting.
Parking Mode and Battery Protection
Parking mode is the primary reason most drivers invest in a hardwire kit. When enabled, your dash cam continues recording (or buffers motion-triggered clips) while your car is parked. However, this feature must be balanced against battery drain.
How Low-Voltage Protection Works
Most quality hardwire kits include an adjustable low-voltage cutoff. You can typically set it between 11.6V and 12.4V (for 12V systems). When your car battery drops to the selected threshold, the kit cuts power to the dash cam, preserving enough charge to start your engine.
Choosing the Right Cutoff Voltage
- 11.6V: Maximum recording time, but higher risk of battery drain in cold weather or with an aging battery.
- 12.0V: A balanced setting suitable for most vehicles and climates.
- 12.2V–12.4V: Safest for battery health, but shorter parking mode duration.
Parking Mode Recording Types
Dash cams handle parking surveillance in different ways. Some record continuously at low frame rates, while others use motion detection or time-lapse. Understanding your camera's capabilities helps you set realistic expectations. If you're comparing options, a 4 channel dash cam can monitor multiple angles simultaneously, though it draws more power.
Battery Health Considerations
If your car battery is more than three years old or you frequently take short trips, consider setting a higher cutoff voltage or limiting parking mode duration. An external dash cam battery pack is another option for extended surveillance without draining your starter battery.
How to Choose the Right Hardwire Kit
With dozens of options on the market, selecting the right kit comes down to a few key factors. Getting these right ensures compatibility, safety, and long-term reliability.
1. Match the Connector Type
Check your dash cam's power input port. Common types include mini USB, micro USB, and USB-C. Buying the wrong connector means the kit won't work without an adapter. When in doubt, USB-C kits offer the most future-proof compatibility.
2. Verify Voltage Compatibility
Most passenger cars use 12V systems, while trucks and commercial vehicles use 24V. Ensure the kit supports your vehicle's voltage. Many premium kits handle both automatically.
3. Check the Output Amperage
Dash cams typically draw 1A–2A at 5V. Choose a kit that delivers at least 2A to avoid power-related recording failures, especially if your camera has advanced features like 4K recording or cloud connectivity.
4. Look for Adjustable Low-Voltage Protection
A fixed cutoff is convenient, but adjustable protection lets you fine-tune based on your battery's age and your climate. This feature alone justifies spending a bit more.
5. Consider Build Quality
Look for kits with thick gauge wire, quality fuse taps, and solid connectors. Cheap kits often suffer from voltage drop, loose connections, or premature failure — problems that can damage your dash cam.
6. Confirm Fuse Tap Compatibility
Fuse taps come in different sizes: ATO/ATC (standard), mini, micro2, and low-profile mini. Check your vehicle's fuse type before ordering, or choose a kit that includes multiple tap sizes.
If you're still deciding on your primary camera, our guide to the cheap dash cam options covers budget-friendly models that pair well with aftermarket hardwire kits.
Compatibility Checklist
Before purchasing a hardwire kit, run through this quick compatibility checklist to avoid returns and installation headaches.
- Dash cam connector: Mini USB, micro USB, or USB-C?
- Vehicle voltage: 12V passenger car or 24V commercial vehicle?
- Fuse type: Standard, mini, micro2, or low-profile mini?
- Fuse box location: Is it easily accessible under the dash or in the engine bay?
- Parking mode support: Does your dash cam have a parking mode feature?
- Cable length: Is the kit's cable long enough to reach from fuse box to camera?
- Low-voltage cutoff: Does the kit offer adjustable protection?
If your dash cam doesn't support parking mode natively, a hardwire kit still provides cleaner installation and frees your 12V socket — but you won't gain surveillance capability. Similarly, if you're using a rechargeable dash cam, hardwiring may not be necessary since it has its own battery.
Recommended Dash Cam Hardwire Kits
⚠️ AFFILIATE DISCLOSURE: This website contains affiliate links. As an affiliate Associate, we earn from qualifying purchases. If you make a purchase through these links, we may receive a small commission at no additional cost to you. Read our full affiliate policy.

REDTIGER F7N Dash Cam Hardwire Kit USB C Port, Dashboard Camera Car Charger Cable Kit 12V- 24V to 5V w/Fuse Kit, Low Voltage Protection for Dash Cam Double-4 Fuses
Check price on Amazon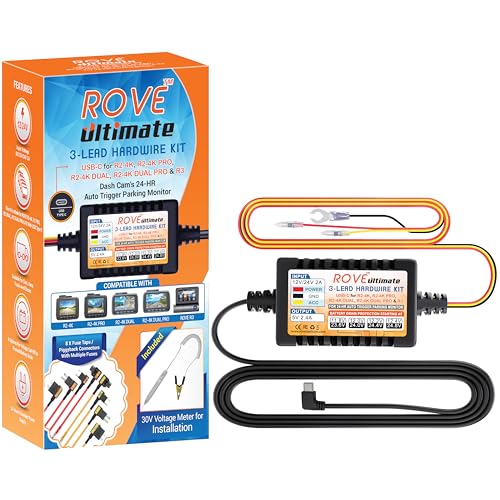
ROVE Ultimate Dash Cam Hardwire Kit, USB-C Port, 24Hr Parking Monitoring | Low Voltage Protection, Fits R2-4K, R2-4K PRO, R2-4K DUAL, DUAL PRO and R3 Dash Camera Models with USB Type C Port
Check price on Amazon
Dash Cam Hardwire Kit USB C, 12V-24V to 5V/3A Adapter Power Cable with Voltage Display, 24/7 Parking Mode, Acc Detection, 4-Level Low Voltage Protection (11.6V/11.9V/12.2V/12.5V)
Check price on Amazon
Gebildet Dash Cam Hardwire Kit, Type C USB Hard Wire Kit 12V-24V to 5V Hardwire Kit with Low Voltage Protection 13ft/320cm Car Dash Camera Charger Power Cord for Dashcam Supply Radar Detectors
Check price on Amazon
VIOFO HK4 Hardwire Kit with 8pcs Full Set Circuit Fuse Tap, Type-C Port, for A329 series/A229 series/A119Mini2/A139Pro/WM1/T130 Dash Cam
Check price on Amazon
Vantrue 11.5ft USB-C Hardwire Kit, Compatible with All Vantrue Dashcams | 12V–24V to 5V, Hardwire Kit with Acc Functionality, Low Voltage Protection for Dash Cam, 24/7 Parking Mode for DashCam
Check price on Amazon
Dash Cam Hardwire Kit,[Upgraded Version] USB C Hardwire Kit for Dash Camera with 12V-24V to 5V Power Supply,Fuse Tap,Blade Fuses & Pry Tool,Protecting Car Dash Cam Front and Rear
Check price on Amazon
Upgraded Dash Cam Hardwire Kit, Type-C USB Hard Wire Kit 12V-24V to 5V Hardwire Kit with Low Voltage Protection 13ft Dash Cam Charger Power Cord for Dashcam GPS Power Supply Radar Detectors and More
Check price on AmazonFrequently Asked Questions
Can I install a dash cam hardwire kit myself?
Yes, most hardwire kits are designed for DIY installation. The process involves locating your fuse box, inserting fuse taps, routing a cable, and connecting a ground wire. Basic familiarity with automotive electrical systems is helpful. If you're not comfortable working with fuses and wiring, professional installation typically costs $50–$150.
Will a hardwire kit drain my car battery?
Not if it includes low-voltage protection. Quality kits automatically cut power when your battery drops below a set threshold (usually around 11.6V–12.4V). However, if you frequently take short trips or have an old battery, consider raising the cutoff voltage or limiting parking mode duration.
Do all dash cams support hardwire kits?
Most dash cams with a standard USB power input can work with a hardwire kit, provided the connector matches. However, parking mode functionality depends on the camera's firmware. Check your dash cam's specifications before purchasing.
How long does installation take?
A typical hardwire kit installation takes 30–60 minutes for a single-camera setup. Dual-camera systems with rear routing may take 60–90 minutes. Professional installers can usually complete the job in under an hour.
What's the difference between a 2-wire and 3-wire hardwire kit?
A 2-wire kit provides constant power and ground, sufficient for basic parking mode. A 3-wire kit adds an accessory (switched) wire that tells the dash cam when the ignition is on, enabling more advanced mode switching. Check your camera's requirements to determine which type you need.
Can I use a hardwire kit with a rental car?
It's possible but not recommended without permission. Hardwiring involves accessing the fuse box and may void rental agreements. For rental vehicles, a simple 12V socket adapter or a rechargeable dash cam is a safer choice.
How much should I expect to pay for a quality hardwire kit?
Reliable hardwire kits range from $12 to $40 depending on features. Basic 2-wire kits start around $12–$20, while 3-wire kits with adjustable voltage protection and premium build quality cost $20–$35. OBD-II kits and 24V-compatible models sit at the higher end.
Ready to Upgrade Your Dash Cam Setup?
A hardwire kit is a small investment that transforms your dash cam into a full-time security system. Browse our recommended kits above and enjoy 24/7 peace of mind.
SHOP HARDWIRE KITS